

Kyle’s Kitchen- Penn, Teller, & Kyle’s Bleeding Cakes
If there’s any better day to share this recipe than April Fools it could only be Halloween, but we don’t want to wait till October to tell you about it! The original recipe came from “Penn&Teller- How To Play With Your Food”, but we couldn’t find a printed version. Instead, we’ll offer you TWO OTHER VERSIONS of this hideously tasty treat.
First, here’s a “Bloody Valentine’s Heart” version from theprojectmaker in LivingHolidays
Ingredients (and specialized cooking devices)
- One heart-shaped mold (anatomically correct version from www.anatomical.com, egeneralmedical.com, or thefind.com, or you can use a valentine-heart shaped cake pan)
- 1 large package of Strawberry flavor gelatin (6oz or 170g)
- 1/2 can evaporated skim milk
- Food coloring (the pastes are preferable to the liquids)
- Clean paintbrush to apply the colorings
- Clean produce bag for the blood (produce bags are light and thin)
- Corn syrup and Grenadine for the blood
- Non-stick cooking spray for the mold
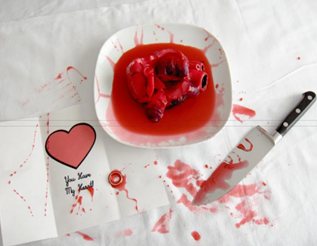
The “Bloody Valentine Heart” from TheProjectMaker
Mix Up the Heart and Prep the Mold
- Mix 1 cup of boiling water into the gelatin powder. Stir until the powder is dissolved.
- Add 1/2 a can of evaporated skim milk and stir well.
- Prepare the mold by spraying it lightly with some cooking spray to prevent the heart from sticking in the mold.
- Sit the mold in a bowl surrounded by a towel to hold it upright. Pour in a small amount of the liquid, just enough to cover the bottom about a half-inch worth. Stick this in the fridge to cool. Put the rest of the liquid aside for now.
Make the Blood and Blood Bag
- Combine Corn Syrup, Grenadine, and red food coloring to make blood.
- If you want your heart to OOZE blood, then use more corn syrup for a thicker blood.
- If you want your heart to SPURT blood when stabbed, use more grenadine for a thinner blood.
- The color of the blood can be deepened by adding a small amount of green coloring.
- Put the blood into the corner of the clean produce bag and tie it off with as little air in it as possible so you have a nice snug blood bag. The size of the bag should be such that it will fit into the heart mold.
Complete the Heart
- Make sure the small amount of gelatin mixture we put into the mold has firmed up enough for the blood bag to sit on. If so, remove from the fridge, cut any excess bag “tail” off the blood bag, and place it carefully in the center of the mold, resting on the firmed-up layer we poured earlier.
- Fill the rest of the mold with the remaining gelatin mixture and place the heart into the fridge to cool and set.
- Allow to chill at least several hours, preferably overnight.
- Once the heart has set, remove the heart from the mold by loosening the edges with your fingers then turning it out onto a plate.
- Trim away any excess from the edges of the heart. Cut at an angle around the bottom edge for a better effect.
- With a small spoon, scoop out the arteries up top. Use a straw for the smaller ones.
Now try the “Bleeding Cake” from SugaredNerd.com
Ingredients
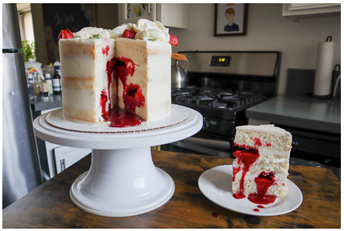
The “Bleeding Cake” from Sugared Nerd
Raspberry Coulis
- 12 oz. frozen raspberries
- scant 1/2 cup sugar
Lemon White Cake
- 5 cups cake flour
- 1 Tablespoon baking powder
- 1 teaspoon salt
- 5 egg whites
- 5 cups milk
- Juice of 1 lemon
- Zest of 3 lemons
- 1 3/4 cups sugar
- 1/2 cup vegetable oil
- 1/4 cup softened butter
- 2 tsp vanilla extract
Vaniilla Buttercream
- 3 cups butter, at room temperature
- 12 cups sifted powdered sugar
- 2 tablespoons vanilla
- 4-5 tablespoons heavy cream
- 1/4 teaspoon salt
Preparation
Make the Raspberry Coulis (at least 1 day ahead)
- Thaw frozen raspberries.
- Add raspberries to a mesh strainer set over a bowl, and use a spatula to push the raspberry pulp through the strainer.
- Once the raspberry mash has given up most of its juice and pulp, set the seeds aside and add sugar to the raspberry puree.
- Transfer puree to a small saucepan and heat over medium-high for about 5 minutes, until sauce has reduced and darkened in color.
- Allow to cool, then pour the raspberry coulis into 2 plastic-wrap-lined receptacles smaller than 6 inches in diameter. Transfer to the freezer and freeze overnight.
Make the Cake
- Preheat oven to 350°F. Line three 8” cake pans with parchment paper and spray with Baker’s Joy.
- In a small bowl, combine the cake flour, baking powder and salt.
- In a separate bowl, combine milk and lemon juice. Milk will appear to curdle – this is normal.
- In a large bowl, combine the lemon zest and sugar. Add the oil and butter to the sugar and use a hand mixer to combine. Add vanilla and mix well. Add 1/3 of the flour mixture, mix on low to combine, then add 1/3 of the milk mixture, mix, and continue alternating until all the flour and milk has been added to the batter.
- In a separate bowl, whisk the egg whites to stiff peaks with a stand or hand mixer. Add egg whites to the batter and fold until there are no more streaks left.
- Evenly split the batter into the lined cake pans and bake for 25-28 minutes, or until a toothpick inserted into the center of the cake comes out clean. Allow to cool in the pan for 10 minutes before inverting onto a cooling rack
Make the Buttercream
- Mix the room temperature butter with the powdered sugar and salt at low speed until it’s a frosting-like consistency.
- Add vanilla and cream 1 tablespoon at a time until desired consistency is achieved.
Assemble the Cake
- Spread a thin layer of buttercream frosting on two of the cake layers and chill in the fridge for about 10 minutes, or until the frosting is no longer sticky to the touch.
- Remove one of the frozen raspberry coulis disks from the freezer and place it on the bottom layer of your cake. Use the buttercream to fill around the frozen coulis, creating a frosting dam to hold it in.
- Add the second cake layer, buttercream-side-down, and fill in any spaces between the layers with more buttercream.
- Add another thin layer of buttercream to the top of your second cake layer and the bottom of your third cake layer.
- After another chill in the fridge, repeat all these steps with your 2nd frozen raspberry disk. Frost & decorate the outside of the cake as desired, then transfer to the fridge for at least a few hours to be sure the raspberry coulis has thawed back into a liquid state.
Presentation:
A cake bleeding on your table is pretty unnerving, but the success of the presentation depends on your acting and improv skills. Don’t rush to the stab… set it up with a story about how good food builds strong blood, or how (for Valentines day) they’re the blood that makes your heart work, or (for Halloween) a disturbing tale about cake/human hybrids. Let your imagination run wild. When you DO commit to the stab, the first poke or two can be pretty calm… give it a twist and give the blood time to ooze out a little. Then go wild with the stabbery, but keep it focused on the cake! And pro-tip… make sure it’s a tablecloth you don’t care about because the blood WILL stain!